Animal Head Reference for Drawing
Choose an animal and orient a 3D model to find real head reference photos taken from an angle close to your sketch.
How to find an animal head reference by angle
Choose an animal head reference for drawing by matching the turn first. If your sketch falls between two presets, rotate the skull a little at a time. Compare two nearby photographs and pick the one that gives you a clearer view of the eyes, muzzle and jaw.
Choose the animal
Gray wolf is the longer-muzzled study and domestic cat is the shorter-faced study. For a wolf, look at the distance from the eye socket to the nose and the wedge formed by the muzzle. For a cat, look at the rounder cranium and the steeper transition into the muzzle. The models represent individual specimens, so treat them as a guide to broad proportions. Use the photographs to see variation among live animals.
Set the head angle
Use Front, either three-quarter preset, or a left or right profile. The direction describes where the muzzle points on your screen. Drag horizontally to turn the skull and vertically to look from above or below. You can also focus the viewer and move it with the arrow keys. Zoom changes the size of the model on screen while leaving the search angle alone. Reset restores the front view, eye-level tilt and original zoom for the selected animal.
Compare the closest photos
Results update as you adjust the view. Start with the first two or three thumbnails and choose the one whose muzzle axis, visible eye and cheek outline best match your sketch. Open the photo to see the wider frame and the lighting around the head. If you need to cite or revisit it, follow the original-source link and keep a note of the creator and license shown in the preview.
Compare three animal head reference angles
These gray wolf photographs show three ways to check the same facial landmarks. Open the corresponding angle in the viewer to see how the underlying skull changes. Use the photos for the eyes, nose, ears and fur, including where those features extend beyond the bone.
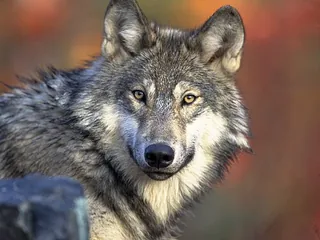
Front view
Use a front-facing reference to set the eye spacing, nose width and centerline. Mark the center of the nose first, then compare the inside corners of the eyes on both sides. Small changes in head tilt can make one ear look higher. The width of the fur around the cheeks can also hide the location of the bony cheek on a thick-coated wolf.
USFWS/Gary Kramer · Public domain · Source photo
Try front view
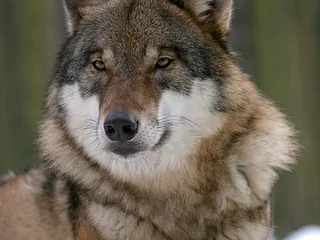
Three-quarter view
A three-quarter view keeps both eyes in view while revealing one cheek and the length of the muzzle. Draw the centerline over the brow and along the bridge of the nose. Look at how the far eye gets closer to the silhouette as the head turns. Compare the negative space between the near ear, brow and cheek before adding fur texture.
Pieter-Paul G · CC BY-SA 4.0 · Source photo
Try ¾ left
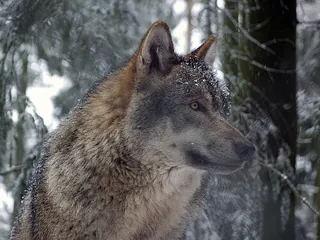
Side profile
A profile makes the forehead slope, jawline and forward projection of the muzzle easy to compare. Start by tracing the profile from the nose back toward the ear. Then mark the angle between the mouth line and the lower jaw. A slightly turned profile can still show the far ear, so use the nose and eye socket to judge how close it is to a true side view.
Gunnar Ries Amphibol · CC BY-SA 3.0 · Source photo
Try right profile
How angle matching works
The tool filters to the animal you selected, then ranks its photographs by the angular distance between the viewer and the estimated orientation of each pictured head. A frontal image and a head facing left may both show two eyes, but a photo pointing in the same direction comes first when its tilt is also close.
Read the angle as a drawing cue
Turn is how far the muzzle points left or right. Tilt describes whether you are looking down on the head or up from below. Two photographs with similar turns can show very different amounts of the top of the muzzle. Watch the overlap of the eyes and the space above the nose when tilt matters to the sketch.
Try a nearby view when coverage is thin
The starter collection has more photographs around eye level than at steep angles or behind the head. At these edges you will see a note and the nearest examples still available. Ease back toward eye level and keep the direction you need. You can use the skull to block in foreshortening and borrow surface detail from a close photo.
Use the full photo to check perspective
The ranked thumbnails help you scan angles quickly. A photograph may show a different posture, expression, coat or lens perspective even when its head direction agrees with the model. Open the preview to see whether the neck continues the line of action you intend and whether the lighting reveals or obscures landmarks you want to draw.
Animal head reference FAQ
What animals can I use as drawing references?
The photo menu includes animals such as wolves, cats, sheep, tigers, and orcas. Each entry has its own photo set. The viewer automatically shows a matching skull or an orientation guide. When you change species, the viewing angle stays the same so you can compare head shapes from the same direction.
Are front, side and three-quarter views available?
Yes. Front looks straight toward the nose. The three-quarter presets turn the view about 45 degrees in either direction. The profiles turn it about 90 degrees. The photo collection is curated, so the nearest photo can differ from the exact preset.
Can I use the tool on a phone?
You can drag the skull with one finger, use the angle buttons and tap a photo to see its preview. Scroll outside the viewer to reach the results and the examples. If your browser cannot start 3D rendering, the animal selector and angle presets still work for photo matching.
Why did the first photo change when I tilted the skull?
Photo order combines turn and tilt. A small tilt can move a higher or lower viewpoint ahead of a photo with the same side-to-side turn. This is useful when the sketch shows more of the top of the muzzle or the underside of the jaw.
What if my animal head reference shows a different expression?
The ranking uses direction. For an open mouth, flattened ears or a snarl, look through several nearby views and choose a photo with the expression you need. You can use a second reference for the skull proportions and compare it with the expression photo.
Can I reuse the photos in a presentation or artwork?
Open each photo and read the license on the original source. Credits and license requirements vary by photograph. Some photos require attribution and some have ShareAlike terms for adaptations. The model and photograph credits are listed separately.
How do I save an animal head reference for drawing later?
Open a photo and choose Save photo to keep it for another drawing session in this browser. Use Saved only to find your selections for that animal. Share this angle sends the animal, turn and tilt. To share a specific photograph, open its original source and copy that link.
See model and photo credits