Wolf Head Reference for Drawing
Rotate a gray wolf skull and look up real photographs for the angle you need.
Choose a wolf head reference for your sketch
Start with the turn your drawing needs, then decide which parts of the face the reference needs to show. A clear outline is helpful for construction, while a second photograph can show where fur obscures that outline.
Block in the muzzle and cranium
Think of the cranium as a rounded mass and the muzzle as a long tapering volume. Stop the skull at a three-quarter angle and compare the length in front of the eye socket with the size of the mass behind it. On a blank page, place those two masses and draw a centerline from the forehead toward the nose. This gives you something to check before you commit to any fur or eye detail.
Turn the model to match the sketch
Use a left or right profile for the longest visible muzzle, and lower the turn toward Front if you need both eyes. Tilt in small steps and check the top of the nose bridge. Save one close photograph for the silhouette and a second for the surface. If you are studying a specific wolf, choose a source that identifies the animal, because the library includes different individuals and subspecies.
Check the silhouette in the full photo
Open the thumbnail to see how the lower jaw and neck sit in the original frame. Fur on the cheek can widen the head and partly hide the jaw. The edge of an open mouth can also pull your attention away from the underlying profile. Outline the head once with the mouth shape included, then do a second pass to mark the bone and soft-tissue landmarks separately.
Front, three-quarter and side wolf references
Use these three photographs as a turnaround exercise. Keep the scale of the finished sketches consistent by marking the top and bottom of the bony head before you place the ears.
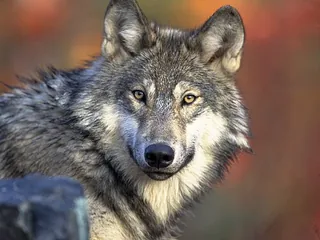
Front wolf head
Begin with the nose and the inner corners of the eyes. In a nearly frontal photo the near and far sides are similar in width, but even a small turn can shift the nose off the center of the brow. The outer cheek line may be much wider than the cheekbones. For a short study, draw the centerline, eyes and nose before suggesting the thickness of the winter coat.
USFWS/Gary Kramer · Public domain · Source photo
Load the front angle
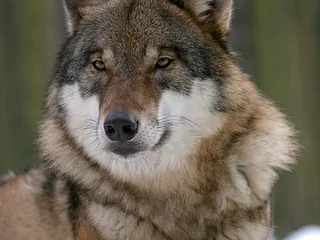
Three-quarter wolf head
When the head turns, the near cheek has more visible area and the far eye appears closer to the face contour. Trace the top edge of the muzzle and note where the far side disappears behind the bridge. Keep the nostril and the near corner of the mouth on the same muzzle plane. Use the far ear as a quick check of how much of the other side you can still see.
Pieter-Paul G · CC BY-SA 4.0 · Source photo
Load the ¾ left angle
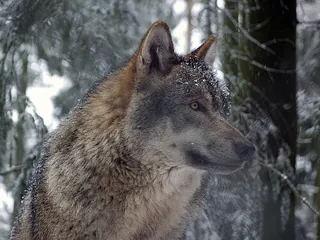
Wolf side profile
The side view makes the forehead slope and the length of the muzzle easy to judge. Mark the tip of the nose, the eye and the hinge region of the jaw before drawing the coat. The live ear can pitch forward or back independently of the skull, so use the ear attachment and the eye line to place the head before you copy the outline of the ear itself.
Gunnar Ries Amphibol · CC BY-SA 3.0 · Source photo
Load the right profile
Read the search results
The gallery starts with the six closest photographs based on head turn and tilt. Use Show all photos to inspect the full wolf set when you also need a particular expression or type of lighting.
Look for head direction within body direction
A wolf can stand broadside and look at the camera. Read the nose, visible eyes and cheek planes before you judge the angle from the shoulders. For a drawing that shows the whole figure, pick a full photograph with both a useful head direction and a body orientation that suits the pose.
Use landmarks across changing expressions
The tip of the nose and the rounded areas around the eyes help anchor the construction. A snarl can lift the upper lip and expose teeth far back toward the cheek, changing the outer mouth contour. Keep the direction of the muzzle consistent while you use the photo to place the expression.
Allow for anatomy and camera distance
A short camera-to-subject distance can enlarge the nose relative to the eyes, and a thick coat adds width around the cheek and neck. Compare two shots from near the same angle if the reference looks unusually broad or narrow. Transfer the perspective you need, then use the second shot to check which details are consistent.
Repeat the wolf head from a new angle
Draw the same outline from front and side, then load the three-quarter view and combine what you learned. Keep the length of the nose bridge consistent in the underlying construction even though it will look shorter when it points toward you. To check the second drawing, compare the eye and nose positions against the first two views. Keep coat details for the end so you can still see and correct the large shapes.
Wolf Head Reference FAQ
Which view shows the length of a wolf muzzle most clearly?
Start with a true side profile. The eye, top of the muzzle and tip of the nose can be placed along the same side of the drawing. Turn toward a three-quarter view when you need to show the width of the muzzle as well.
How should I place the far eye in a three-quarter view?
First trace the centerline and the brow. In the photograph, note how much of the far eye remains visible past the nose bridge. Use that small shape and its distance from the silhouette as a guide.
Can I draw a wolf from the skull view alone?
Use the skull to place the cranium, muzzle and jaw. Refer to live photos for the nose, eyes, ears and the edges of the coat. Those features can change the silhouette significantly.
Why does a side reference look slightly down or up?
A profile describes turn. A camera or head tilt can still show part of the top or underside. Use the vertical drag control and compare the bridge of the nose with the visible lower jaw to decide which version fits your sketch.
How do I save a wolf head reference?
Open the photograph, choose Save photo, and use Saved only to find it again on this device. A share link records your animal and angle so another person can rerun the search.
Where can I check photo credits?
Open the photograph and follow its original-source or license link. The full frame can also help you check the posture and cropping before you use the photo in a study.
See model and photo credits